Guess I’m feeling pretty nostalgic ― because today, I re-wrote one of my first Ruby programs:
A grocery list maker! (This is actually a Treehouse assignment…with my own enhancements sprinkled on top for extra credit.)
Here’s the main data structure:
- A hash (storing the list’s name and items)
- An array of hashes (storing each item’s unique information)
A year ago, it felt like a Russian nesting doll of data (and kinda gave me a headache, to be honest).
But it’s a lot easier to mentally process now ― thanks to JumpStart, JumpStart Live and other resources.
So, what does it look like? Take a look!
This program:
- Continuously collects user input
- Prints the input in an organized list (once the user is finished entering data)
You’re probably thinking, “Okay, Jansen, but how did you actually code this?”
(If you’re one of my friends, you’re probably not thinking that. Bless you for playing along anyway.)
Anyway, read on for more deets!
Methods for the Madness
First off, I defined my methods. Altogether, I made five of them.
Here’s method one:

Anytime I collect user input multiple times, I end up making one of these.
Why? Because it’s WAY more convenient to do the gets.chomp dance once ― and be done.
Here’s what this method does:
- Accepts question as the argument
- Prints question and a space (for formatting)
- Collects user input, assigns it to variable answer
- Returns answer (so I can use it outside of the method)
Note: I used to think I needed to manually tell Ruby to return answer. But I recently learned it does it for you by default. (Nice.)
Now…let’s take a look at my second method:
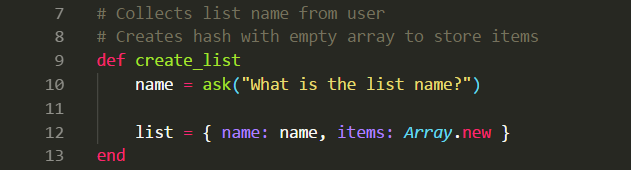
I used this method to…yep, create a list!
You’ll notice my ask method makes an appearance here. The user prompt "What is the list name?" becomes the argument. The ask method collects user input, and then assigns it to the variable name.
Next, the method creates a hash. This hash is assigned to the variable list. (A new array is one of the values.)
Next, is my third method. It can add items to our list later.
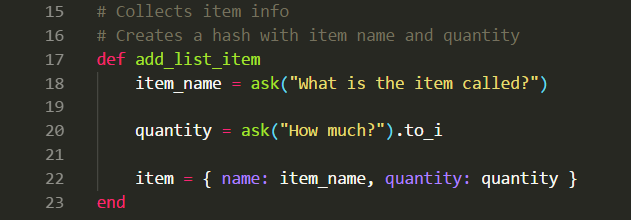
The ask method appears twice here.
The first time, it assigns user input to item_name. The second time, it assigns user input to quantity (after turning it into an integer with .to_i).
Finally, it creates a new hash. This hash is assigned to item.
Method four (out of five)! This is mostly for formatting….

Something I didn’t know: You can define your argument when creating a method!
In this case, I defined character as - (a string). Then, I tell it to print character a whopping 80 times with the * operator.
Alright. So, what about the fifth (and final) method?
A few things going on here.
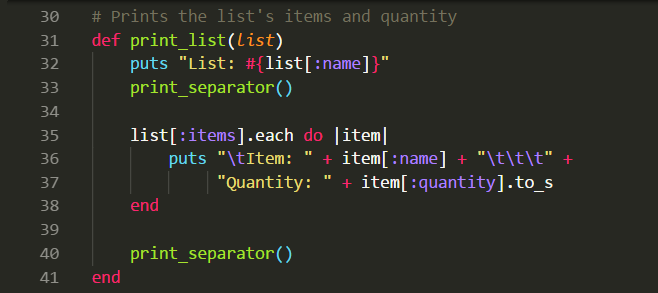
Let’s unpack the first bit. Starting off, this method….
- Accepts list (a hash from create_list) as an argument
- Prints the list name (or the value connected to the name key inside list)
- Calls print_separator for formatting
Next, we’ve got a .each loop. Here’s what that does:
- Peeks into the array connected to the items key (inside list)
- Iterates over each hash inside the array
For reference, here’s what list might look like:
list = { name: "Groceries", items: [{ name: "Milk", quantity: 1 }, { name: "Bread", quantity: 2 }, { name: "Eggs", quantity: 3 }] }
Pink denotes the key-value pairs inside the main hash. Blue denotes each element inside the array connected to items.
In other words, each blue hash represents a single grocery item.
Here’s what the .each loop is doing: Iterating over each grocery item, and printing that item’s name and quantity.
Making the List
OKAY. That’s all five methods. So, how do we ACTUALLY make a grocery list?
Easy! Here’s how…
- Create a new list
- Continuously add items to the list (until user is finished)
- Print a list of our items
Let’s start by creating a new list!

Remember the create_list method from earlier? That’s what I’m calling here.
It returns a hash that looks like this: { "name" => "Groceries", "items" => [] } . This hash is assigned to variable list.
So, we’ve got a list now. Cool!
How about adding some items to that list?
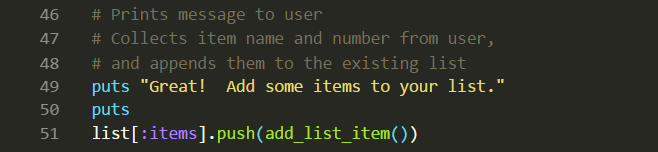
Now I’m prompting the user to enter an item.
Enter our add_list_item method. This method collects an item’s info…and returns a hash with that info.
That hash is then entered as an argument for .push. The .push function then adds our new item to the list hash.
The original Treehouse tutorial just calls the add_list_item three times, and then calls it good.
In other words, the program originally collected three items. No more, no less.
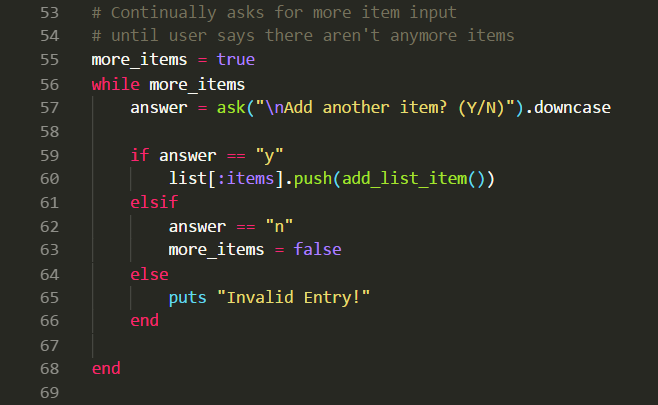
For extra credit, we’re asked to add a loop ― so the user can add as many items as they want.
Simply put, I want to continuously add items to our list. That’s where my while loop comes into the picture…
Imagine making a grocery list. You’ve got the essentials down: milk, bread, eggs…
But then you remember something ― you’ve gotta pick up some juice! So you quickly jot “juice” down.
Normally, I’d use a .times loop (based on the number of items specified by the user). But it’s not terribly conducive for those “oh yeah, I’ve gotta get XX” moments. Hence, my while loop!
In this case, I’ve initialized the variable more_items as true. And as long as more_items stays true, then this loop will continue.
Here’s what this loop does:
- Collects user input and assigns it to answer (using ask)
- Evaluates answer
- Adds new item to list (using add_list_item and .push) if answer equals "y"
- Breaks loop if answer equals "n"
- Prints "Invalid Entry!" if answer doesn’t equal "y" OR "n".
Alright, let’s say the user is finished adding items. Now we can print our list!

Remember our print_list method from earlier? It formats our list by iterating over each item inside the "items" array ― inside our list hash.
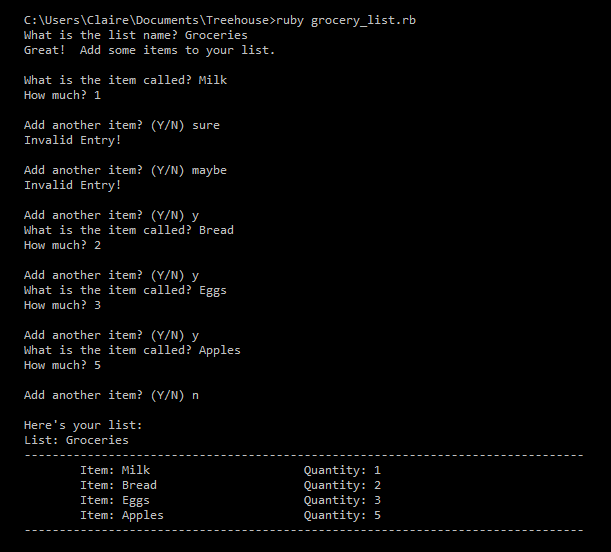
Here’s a sample run:
Summary
I created the grocery list program covered in the Ruby module of Treehouse. But I also enhanced it by adding my own while loop.
The user is no longer limited to a fixed number of items. Instead, they can keep on keepin’ on ― and add new items, until they break the loop by entering "n" or "N".
I also added my own ask method. This makes it easier to collect user input throughout the program (since I only need to write gets.chomp once).
This exercise let me practice three things:
- Defining and working with methods
- Working with hashes inside arrays…inside hashes
- Nesting if-elsif-else statements inside a while loop
Notes about Data Structures
The main data structure was a little more complicated than I’m used to. Normally, I work with an array of hashes.
That’s true here, too ― but now the array is chillin’ out inside another hash.
Something to consider, though: The bulk of our data is still inside the array full of hashes.
Why? Because hashes let us be descriptive with our data, and tucking those hashes inside an array lets us keep things nice and orderly ― without accidentally overwriting a key-value pair.
A hash is, in turn, housing this array. But that’s because a hash is still ideal for storing descriptive information.
I’ll show you what I mean. Our main hash has two jobs here:
- Store the list’s description
- Keep track of items entered by the user
One hash can do the first job this fine. As for the second job…
Well, it needs to delegate the items to an array of hashes. That’s because we need the descriptiveness of hashes, with the indices of an array to keep things nice and tidy. (After all, each key needs to be unique ― and we don’t want to overwrite anything, right?)
I like to imagine the main hash as a chest of drawers. I can keep my passport on top of the drawer…but I need to keep all my socks (or grocery items) in the socks drawer (or an array attached to the “items” key).
(Maybe not the best analogy. I’ll workshop it, hahah.)
Something cool I learned: You can define arguments inside methods (see the print_separator method).
Until next time!
