JSL Day 3 covers the following:
- Scope
- Loops
- Iterators
Scope
Scope defines when something (usually a variable) is visible to something else in a program.
When we try to use a variable that isn’t visible, we’ll get an error in our code.
Here are four of the main types of variables in Ruby:
- Class variable
- @@name
- Visible to the class, and sub classes.
- Instance variable
- @name
- Visible to a specific object, and the instance methods of that object.
- Global variable
- $name
- Visible to everything in the file
- Local variable
- name
- The scope depends on the situation
Learn Ruby the Hard Way started introducing instance variables by Exercise 41 (and the concept of global variables earlier than that).
Even so…I’m used to dealing primarily with local variables. (Plenty of people who do JSL are in the same boat. So, that’s what this section mostly focuses on.)
>> Local variables are only visible inside the block in which they’re defined!! <<
Here are a few examples of what that means (in Ruby):
1. Local variables created outside of a block are visible to everything inside of that file.
For example, if we define a variable called name outside of a while loop, we’d be able to use name inside of the loop without any problems.
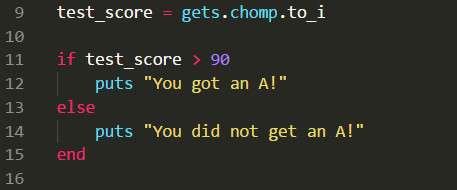
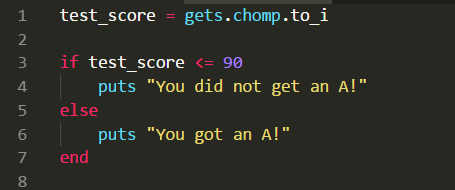
2. Local variables created inside if–statements are visible outside of those if–statements.
This is because if-statements aren’t considered blocks in Ruby, as far as scope is concerned. (Note: That’s not true in other programming languages!!)
3. Local variables created inside of a block are NOT visible outside of those blocks.
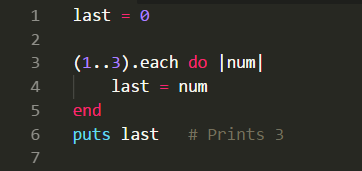
Here’s an example of code that will give us an error…

In this case, we’re defining a new variable named last inside of an iterator, over the range 1 to 3.
This code is trying to print last outside of the block, but we can’t see it.

A simple way to fix this code is to initalize last outside of the block, like so:
Loops
This section introduces four loop-related definitions:
- Loop: Repeats a sequence of statements. It tells the program to do something a certain number of times, or until a certain condition is met.
- Infinite loop: A loop that runs forever…or until you kill the program.
- Sentinel-controlled loop: When the number of loops CANNOT be determined prior to loop execution (e.g. while, until)
- Counter-controlled loop: When the number of loops CAN be determined prior to loop execution (e.g. times)
Cool! Let’s take a closer look as certain loops…
Sentinel-controlled Loops
while loop: While condition is true, executes code over and over again.
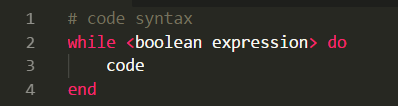
A boolean expression evaluates as either true or false. We define a block with do and end.
Here’s a specific example:
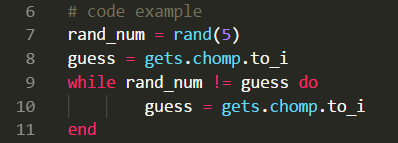
While rand_num is not equal to guess, the loop will continuously prompt the user to input a new number for guess. It will keep repeating until rand_num and guess match.
Here’s another sentinel-controlled loop…
until loop: Until condition is true, executes code over and over again.
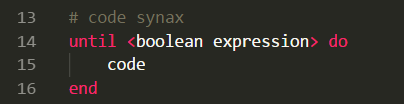
An until loop is basically the opposite of a while loop. It executes over and over again UNTIL a condition is true.
Here’s a specific example:
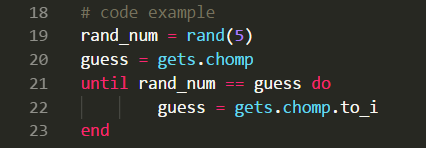
This is similar to our while example, but here’s the difference:
Until rand_num and guess are equal, this loop will keep repeating.
Counter-controlled Loops
Counter-controlled loops are used in other languages a lot more often than in Ruby.
In Ruby, you’d typically use an iterator. However, .times without an iteration variable becomes a counter-controlled loop.

We’re saying, “Hey Ruby! Do this code a certain number of times”.
Here’s what makes this a counter-controlled loop: We know how many times this loop is going to run.
Let’s look at an example:
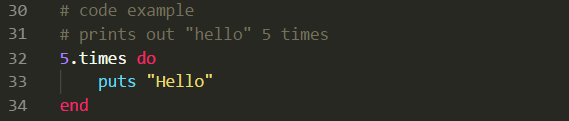
This is telling Ruby, “5 times, repeat this code”. It prints “Hello” 5 times!
Iterators
This section talks about three types of iterators:
- .each
- range.each
- .times
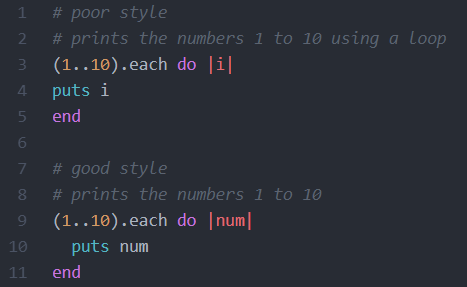
.each iterator: Returns each value of the collection, one by one, to the block. Iteration variable is optional (but usually used).
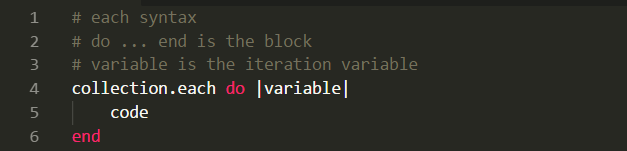
Here’s an example:
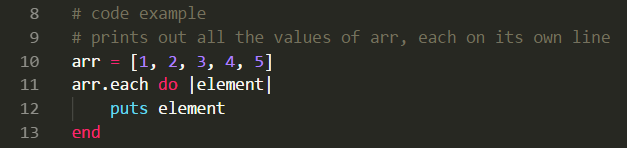
- Example of .each
This block of code prints out each element in the array.
But wait! THERE’S MORE. We can also use a data type called range with .each.
range.each loops: A range is a set of values with a beginning and an end
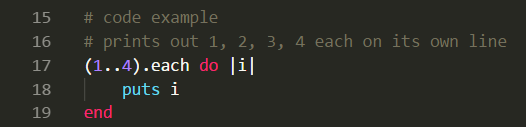
We can pass a range into the code as a collection. It’s similar to how we loop through an array.
Note: When two dots are used, the range includes the last value.
Here’s an example of actual code:
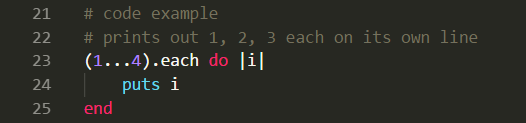
(Note: When three dots are used, the range excludes the last value.)
Next, let’s take a closer look at .times as an iterator!
Because it iterates over a range of values, .times might seem similar to range.each. BUT! They’re actually quite different.
Here’s the syntax:

The syntax is similar to our plain old .times loop from earlier — except it also includes a variable.
Another key difference: The Integer refers to the number of elements inside the collection.
In other words, 2.times would be a loop consisting of 0 and 1. (It doesn’t include 2.)
An example of a .times iterator:
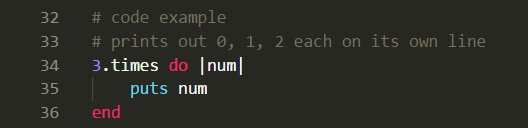
In this case, there are 3 elements in the collection: 0, 1 and 2.
Loop vs. Iterator Comparison
Last, we take a look at a .times loop and a .times iterator.
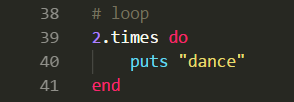
This is how I typically use .times. (More often than I should, to be honest…)
Here’s what the same bit of code looks like as an iterator:
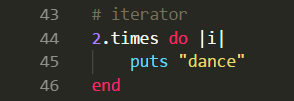
All we’re doing here is printing “dance” two times. We’re not using i for anything.
In other words, we don’t need an iterator. Consequently, the first example is the better solution.
Like I said, though — I use .times as a regular loop more than I should.
For some reason? I thought you had to initialize i outside of the block. BUT NOPE!
GOOD TO KNOW.
Summary
This lesson introduced scope, loops and iterators.
Scope defines when something (usually a variable) is visible to something else in a program. When we try to use a variable that isn’t visible, we’ll get an error.
In Ruby, there are four main types of variables. They each vary in degrees of scope.
Local variables are only visible in the block where they’re defined.
When we define a variable inside a loop, we won’t be able to call that variable outside of that loop. In that situation, we can initialize the variable outside of the loop — because local variables created outside of a block are visible to everything in the program.
Loops repeat a sequence of statements. They tell the program to do something a certain number of times, or until a certain condition is met.
An infinite loop goes on forever — or until you kill the program.
Sentinel-controlled loops depend on certain conditions being met in order to end (while, until). In other words, the number of times it’s supposed to run CANNOT be determined beforehand.
Counter-controlled loops know exactly how many times to run — because the number of times IS determined beforehand (.times without an iterator).
Iterators traverse over the elements in a collection (like an array). They usually do something with those elements.
Three types of iterators are a) .each, b) range.each and c) .times.
.each returns each value of the collection, one by one, to the block. Iteration variable is optional (but usually used).
range.each uses a range — that is, a set of values with a beginning and an end.
.times as an iterator uses Integer to refer to the number of items inside the collection.
Overall, this was a good review!
I was especially glad to get clarification on .times as a regular loop and .times as an iterator. (For some reason, I thought you had to initialize an iterator outside of the block if you wanted to use .times, hahah!)